
Operation Manual


Chapter 6: Creating Discs
109
• click on the tab to set the frame used on a button thumbnail for scenes
and chapter buttons. Click on Import Custom if you want to use your own
custom button frame.
• click on the tab and select the desired layout of the thumbnail buttons
on the selected page. The number of layouts available is dependent on the
template you are editing.
• click on the tab to set the icon that displays when a menu button is
selected or is active. Select an icon from the list or click Import Custom to
import your own custom icon.
Changing Navigation Buttons
To change the navigation buttons that are used in your disc menu, click on the Set
button properties tab and then click on . Select a navigation button style
template from the list, or click on Import Custom if you want to use your own
buttons you custom created.
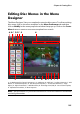
Setting Object Properties
On the Set object properties tab you can customize all of your menu object
properties. The tab lists all of the current objects in your disc menu, including
menu buttons, images, and text.
When you select an item in the objects list, the object is highlighted in the preview
window. Once highlighted, the objects are easily edited, resized, reshaped, or
moved around the disc menu to a desired location.
Note: when resizing objects (buttons, images, etc.) click the button to switch
between rectangle and free form modes. Essentially this allows to decide whether you
want to keep the aspect ratio of the object or not when resizing.
Select Display the selected object only to only display the selected object while
setting the properties. The properties that are available depend on the type of
object you select.