
Operation Manual

CyberLink PowerDirector
100
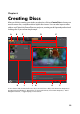
Importing Disc Content
The Content tab contains all of the videos and projects (called titles or scenes on
your disc) that are currently in your disc menu and will be burned to a disc. It not
only includes your current video production, but also any video files or CyberLink
PowerDirector projects you import.
On the Content tab you can add additional titles/scenes to your disc by doing this:
• click on to import any existing videos that you want on your created
disc.
• click on to import any existing CyberLink PowerDirector projects that
you want on your created disc.
Click on the Menu Structure button to view the structure of your disc menu. In the
structure tree you can see all the titles/scenes (videos and projects) on your disc
and any chapters within each title/scene.
Once you import all of the videos and CyberLink PowerDirector projects that you
want into your disc menu, you can then perform the following functions:
• click on to play the selected title/scene.
• click on to remove the selected title/scene from the disc menu.
• click on to edit the selected title/scene in the Edit module of CyberLink
PowerDirector.
• click on Show Chapters to view the current chapters in the title or click the
button to set/edit the selected title’s chapters in the Chapters Room. For
more information on editing chapters see "Chapters" on page 87.
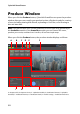
Editing Disc Menus
Click on the Menu Preferences tab to edit the existing disc menu, select another
disc menu template, or to create a new custom disc menu template. All the disc
menu templates in CyberLink PowerDirector are multi-layered, and can consist of
the following pages:
• a main menu home (root) page.
• a scenes page that lets you select the individual titles (videos and projects) on
your disc.
• a chapters page where you can navigate through your titles, if chapters were
added.