
Operation Manual

Chapter 5: Producing Your Project
97
• Delete the file after the write back is complete: select this option to have
CyberLink PowerDirector delete the produced video file after it has written it
back to your DV or HDV camcorder.
• Enable preview during production: select this option to preview your movie
during production. Selecting this option will increase the time required to
produce your file.
Uploading Video to YouTube
In just a few steps, you can upload your video production in CyberLink
PowerDirector directly to YouTube®. If the size/length of the your video exceeds
the maximum allowed, CyberLink PowerDirector will separate the video into
smaller/shorter videos, upload these videos, and then create a playlist for you on
YouTube.
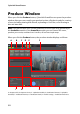
To upload your video to YouTube, select the Yo u T u b e tab and then fill in all of the
YouTube and video information in the fields provided.
Note: log in to DirectorZone and then select Share timeline info on DirectorZone if
you want to show others how you created your video production. When selected, an
animated version of your project’s timeline displays, along with your uploaded video,
on DirectorZone.
Selecting Video Quality
Before uploading your video to YouTube, ensure that you select the desired
quality of your video from the Profile type drop-down. The quality you select will
result in the corresponding quality option being available after the video is fully
processed on YouTube.
Note: the quality option available on YouTube is also dependent on the original
captured video quality and the bandwidth of the user who is watching the video.
Configuring Production Preferences
Before you begin producing, you can select the following production preference: