
Operation Manual


CyberLink PowerDirector
52
Managing Clips in the
Workspace
Once you have loaded media files into the Library, they are ready
to be used in your movie. You can load different types of media
clips into the different tracks in the workspace, move them to
different locations in your story, and delete them from the
workspace.
Add a Clip to the Workspace
The different types of media clips may only be added to specific
tracks. The sections below describe the procedures for adding
each kind of media clip into the workspace.
Note: You may prefer to add clips in Storyboard view, since
this view is simpler than the Timeline view. However,
clips can only be added to the Video track in this view.
Therefore, this section uses the Timeline view in all of
the procedures.
Add Video & Image Clips
You can add video and image clips to either the Video track or
the PiP (picture-in-picture) track. To create the basic framework
of your movie, add video and image clips to the Video track.
Add clips to the PiP track only to create a picture-in-picture
effect.
Note: For more information on using PiP effects, see Replace
an Effect in the Timeline on p.73 and Modifying a PiP
Effect on p.79.
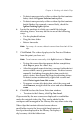
To add video or image clips to the workspace, do this:
1. Click to open the Media Room in the Library.
2. Select Video, Image, or All Media from the Filter drop-
down list to sort the clips in the Media Room.