
Operation Manual


Chapter 4: Working with Media Clips
51
•
To detect more precisely within a video clip that contains
fades, check the Ignore fade-ins/outs option.
• To detect more precisely within a video clip that contains
bright flashes (for example, camera flash), check the
Ignore flashing lights option.
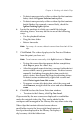
6. Locate the position at which you would like to begin
detecting scenes. You may do this in one of the following
ways:
• Use the playback buttons.
• Drag the time slider.
• Enter a timecode.
Note: You may, of course, detect scenes from the start of the
clip.
7. Click Detect. The video clip plays in the Preview Window
from the point you have set.
Note: To set scenes manually, click Split instead of Detect.
•
To stop the scene detection process before completion,
click Stop or press the <Esc> key.
• After the original scene detection, you may further detect
scenes within a newly generated scene. To detect scenes
manually (including changing detection sensitivity),
select a scene, then repeat the steps for detecting scenes.
To detect scenes automatically, right-click a scene and
select Detect again from this scene.
• To remove a scene after detection, select the scene and
click Remove, or right-click the scene and select Remove
scene.
8. Click OK to close the Scene Detection window.
• To return to the Library, click Up One Level.
Clips created by the new scenes are displayed in a subfolder
under the original video clip. They can be added to the
workspace and managed in the Library like any other video clip.
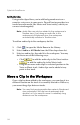
Video clips that contain detected scenes show a
small folder icon in the lower right-hand corner of
the clip when displayed in the Library. To display a
clip’s scenes, click the folder icon.