
Operation Manual


CyberLink PowerDirector
122
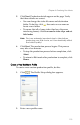
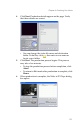
7. Locate the position at which you would like to begin writing
to tape. You may do this in one of the following ways:
• Use the playback buttons.
• Drag the time slider.
• Enter a timecode in the timecode box.
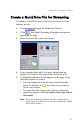
8. Your produced movie file appears in a list in the window.
• Click to add new files to the file list. Select a file and
click to remove it from the file list.
• Select a file then click to bring it closer to the
beginning of your movie when writing to tape. Click
to move it toward the end.
• To ensure that all of your video clips have the same
interlacing format, click Scan source video clips and set
field order.
Note: This is an extremely important step to take before
producing your final movie, as it can drastically affect
final video quality!
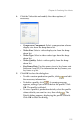
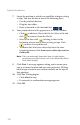
9. Click Start. A message appears asking you to ensure your
tape is at correct location and not write-protected. (Writing
back to tape overwrite any content currently on the tape at
that position.)
10. Click Yes. Writing begins.
• Click Abort to stop.
• If successful, a confirmation message appears.
11. Click OK.