
Operation Manual


86
CyberLink PowerDirector
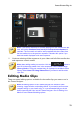
Adding Video Clips and Images
to the Timeline
To start creating your video production, begin adding video clips and images to the
video tracks in the timeline.
If you are not sure which tracks you can add your media to, just select a clip in the
media library. The tracks in the timeline you can add the media to will "light up".
For more information on what media you can add to which track, see Timeline
Tracks.
Note: you may prefer to add video clips and images using the storyboard
view, since this view is simpler than the timeline view. However, you can
only add clips to the first track in this view. Therefore, this section uses the
timeline view in all of the procedures.
You can add video clips and images at any position on any video track in the
timeline. You no longer need to place your media on the top track or at the
beginning of the timeline. You now have total freedom to add the media exactly
where you want, and in the order you want it. Just start placing the media on a
timeline track, in a sequence that tells your story.
Note: if you want to add media to a precise position on the timeline,
consider using timeline markers. See Adding Timeline Markers for more
information.
If you insert or drop media onto other existing media clips that are on the timeline,
don't worry. CyberLink PowerDirector will prompt you to use its ripple editing
feature to overwrite, insert, replace, split, trim, transition, or speed up media to help
you easily place the media where you want it.
Once you add a video clip or image to any timeline track, click the Modify button
above the timeline to edit its properties in the PiP Designer. See Modifying Media in
the PiP Designer for more information.
Note: you can add additional tracks to your project's timeline in the Track
Manager, allowing you to have up to 99 PiP objects displayed on a video at
the same time. See Track Manager for more information.