
Operation Manual


68
CyberLink PowerDirector
the check box next to the clip you want to remove, and then click . To add
additional video clips to the source track, click the button.
Importing Audio Clips
If you want to use an audio clip as the audio source in your recording instead of the
audio of the imported video clips, you can import it separately into the MultiCam
Designer.
To import audio clips, click the Import Audio button and then Import From Hard
Drive to import audio clips from your computer's hard drive, or Import From
Media Room to import clips from the existing media in the Media Room library.
Select one or more clips and then click Open. The clips are placed on the source
audio track in the timeline.
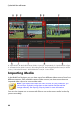
Source Audio Track
All of the imported audio clips are imported into the source audio track. You can
move the audio clips to different locations on the audio track. You can also reorder
the audio clips on the source track by clicking the button next to the track and
then using the and buttons to reorder them as required.
To remove an audio clip from the source track, click next to the track, select the
check box next to the clip you want to remove, and then click . To add
additional audio clips to the source track, click the button.
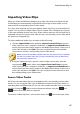
Synchronizing Clips
Once you have imported all of the media clips into the MultiCam Designer that you
want to use in your recording, the next step is to synchronize them.
To synchronize the clips in the MultiCam Designer, do this:
1. Select the Audio source for your recording from the drop-down. You can use
the audio of any of the imported video clips or select Imported Audio to use
the audio that was imported on to the source audio track.
2. In the Synchronization drop-down, select one of the following: