
Operation Manual

30
CyberLink PowerDirector
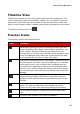
TV Safe Zone/Grid Lines
When you place media on the timeline, use the TV safe zone and grid lines to help
with the precise placement on your video project's image. These display options are
only available when in the Clip preview mode.
Click the button and then select TV Safe Zone > On to enable a box that
indicates the on-screen area of most TV displays.
Click the button, select Grid Lines, and then select the number of lines
you want to display in a grid over the video image. Use this grid to more
precisely place the PiP media and title text on the video image.
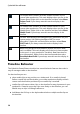
Once enabled, select Snap to Reference Lines* to have the selected objects snap to
the grid lines, TV safe zone, and the boundary of the preview window.
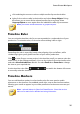
Dual Preview
If you have a secondary display device, such as a monitor, TV, or DV camcorder
connected to your computer, click the button and then select Dual Preview*
to extend your workspace and preview your project on a secondary display.
Note: to use a connected monitor or TV as a secondary preview window,
you must first enable extend desktop to a secondary display in the
Windows Display Properties Settings. * optional feature in CyberLink
PowerDirector. Check the version table on our web site for detailed
versioning information.
Once enabled, when you click play in the preview window, you can preview your
production on both your primary and secondary display when Primary 2D and
Secondary 2D Display is selected. Select DV Camcorder to extend your production
preview to a connected DV camcorder device.
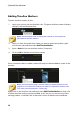
3D Dual Preview
When your desktop is extended to a secondary display, you can enable 3D on one
of the two devices. If you want one of your previews to be in 3D, select either
Primary 2D and Secondary 3D Display or Primary 3D and Secondary 2D Display to
enable it. Your selection depends on which device you want to enable, and which
one supports 3D.