
Operation Manual

249
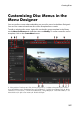
Creating Discs
click on to import additional video files that you want on your
created disc.
click on to import any saved CyberLink PowerDirector projects that
you want on your created disc.
Note: as you add content, click on the M enu Structure button to view the
structure of your disc menu. In the structure tree you can see all the titles/
scenes (videos and projects) on your disc and any chapters within each
title.
While importing videos and CyberLink PowerDirector projects on to the Content
tab, use the following buttons to:
hover your mouse over the title and then click on on its thumbnail to play
back the title.
- edit the selected title in the Edit window of CyberLink PowerDirector.
- remove the selected title from the disc menu.
Click on Show Chapters to view the chapters in the selected title (video or project).
You can click the button to set/edit the selected title's chapters in the Chapters
Room. For more information on editing chapters see Adding Chapters.
Note: as you add content to your disc, note the capacity information at the
bottom of the window. Click to toggle the disc capacity display or
to view the Disc Production Summary at any time.
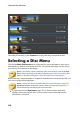
When you are done adding all the content you want on your disc, you can reorder
all the titles simply by dragging them to the position you want.