
Operation Manual


239
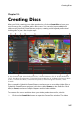
Producing Your Project
Note: the quality option available on Dailymotion is also dependent on the
original captured video quality and the bandwidth of the user who is
watching the video.
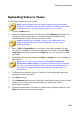
3. Enter a Title and Description for your video in the fields provided. The text
you enter is included on Dailymotion once uploaded. Also select one of the
Video categories and enter in some keyword Tags that users can search for to
find your video.
4. Set whether you want the video to be Public or Private once it is uploaded to
Dailymotion.
Note: sign in to DirectorZone and then select Share in CyberLink
DirectorZone Video Gallery if you want to show others how you adjusted
the clips in your video production. When selected, an animated version of
your project's storyboard displays, along with your uploaded video, on
DirectorZone.
5. Configure the production options as required. See Configuring Production
Options for more information.
6. Click Start to begin.
7. Click Authorize and then grant CyberLink PowerDirector permission to upload
videos to your Dailymotion account by following the steps in the Dailymotion
Authorization windows.
8. CyberLink PowerDirector proceeds to produce and upload the video file. Click
Close when done to return to the program.
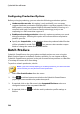
Configuring Production Options
Before you begin producing, you can select the following production options:
Hardware video encoder: this option is only enabled if your computer
supports hardware acceleration (NVIDIA graphics card that supports CUDA, an
AMD graphics card that supports AMD Accelerated Parallel Processing, or a
computer with Intel Core Processor Family technology), and you are
outputting in a file format that supports it.
Enable preview during production: select this option to preview your movie
during production. Selecting this option will increase the time required to
produce your file.
Specify the Output folder, or the location where the produced video file that
will be uploaded is saved. Click if you want to select another output