
Operation Manual


215
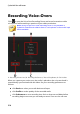
M ixing Audio and Reco rding Voice-Overs
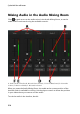
select a clip in the timeline, and then use the master volume controls to
increase or decrease the volume at the current position.
if there is more than one audio clip on the voice or music track, or on any of
the audio tracks, click the Normalize* button to have CyberLink
PowerDirector set the volume for all the clips to the same level.
Note: * optional feature in CyberLink PowerDirector. Check the version table
on our web site for detailed versioning information.
use the master gain control sliders to increase or decrease the volume of all
the media on a track.
use the audio level meter to view the audio level, or loudness in decibels,
during playback. If the audio levels rise to the red levels, you can adjust the
master volume to lower the audio level.
Note: if audio in a clip enters the red level of the audio level meter, CyberLink
PowerDirector marks the area on the timeline in red. Use the master volume
controls and audio level meter to fix the problem area as required.
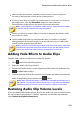
Adding Fade Effects to Audio Clips
To add a fade-in/fade-out effect to an audio clip, do this:
1. Click open the Audio Mixing Room
2. Select the audio clip in the timeline.
3. Ensure the timeline slider is at the beginning of the audio clip, and then click
to add a fade-in effect.
4. Drag the timeline slider to the position in your audio clip where you want the
audio to start fading out, and then click effect.
Note: when you add fade effects, volume keys are added to the audio clip in
the timeline. You can adjust these volume keys to customize the fade effect.
See Mixing Audio In-Track for more information on adjust volume keys.
Restoring Audio Clip Volume Levels
If you are dissatisfied with the volume level of any audio clip, you can easily restore
the clip's original volume level. To do this, right-click on the audio clip and then
select Restore to Original Volume Level.