
Operation Manual


186
CyberLink PowerDirector
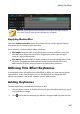
corresponding keyframe track.
Note that keyframes are also added at the start and end of the keyframe track.
3. Use the features in the Title Designer to modify the properties of the title
effect as required for this keyframe. In this example we are modifying the
opacity of the title effect at the first keyframe.
When previewed, at the first keyframe the title effect is the completely
transparent, and then slowly gets more opaque until it reaches the specified
opacity level by the time the playback slider reaches the second keyframe.
It will maintain this opacity until the playback slider reaches the last keyframe,
unless you add more keyframes or change the properties of the last keyframe.
Note: you can also modify the properties of a keyframe by right clicking on
it and selecting Duplicate Previous Keyframe or Duplicate Next
Keyframe. Doing this copies the properties of the specified keyframe to the
keyframe you right clicked on.
4. Repeat these steps to create the kind of effect you want in your video
production using keyframes to modify the title effect's properties.
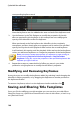
Modifying and Removing Keyframes
At any time you can modify the keyframes added, by selecting it and changing the
title effect's object properties, or by dragging the keyframe to another position on
the keyframe timeline.
To remove a keyframe, select it on the keyframe timeline and then click .
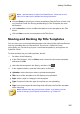
Saving and Sharing Title Templates
Once you finish modifying your title template you can save it to your title effects
library for future use, upload it to DirectorZone to share it with others, or back it up
on CyberLink Cloud*.