
Operation Manual


172
CyberLink PowerDirector
Insert and Move All Clips: select to split the clip and insert the title effect
between the two portions. CyberLink PowerDirector also moves all of the
media clips on the timeline that lie to the right of the inserted clip, right.
Crossfade: select to lay the title effect over a portion of the existing clip and
auto add a fade transition between the two clips.
Note: the Crossfade option does not overwrite the content on the track,
instead adding an overlap transition between the two clips. See Setting
Transition Behavior for more information. The Crossfade option is only
available if the end of the new clip is not over any existing content on the
track.
Replace: select to replace a current clip on the timeline with the title effect.
Use this option if you don't want to change the structure of the current
content on the timeline.
Note: if the duration of the clip you are replacing is longer or shorter than
the title effect, CyberLink PowerDirector automatically resizes it to fit the
original clip's duration.
If the timeline slider is in a gap between two clips on a timeline track when
inserting a title effect, you are prompted to use this ripple editing option to insert
the clip:
Trim to Fit: select to have CyberLink PowerDirector auto set the duration of
the title effect to fit the gap to the right of the timeline slider.
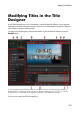
Once added to the timeline, select the title effect template and then click the
Modify button to edit it in the Title Designer. See Modifying Titles in the Title
Designer for more information. For information on setting the amount of time the
title effect appears in your video production, see Setting a Media Clip's Duration.