
Operation Manual


149
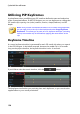
Creating PiP Effects
Note: click the button to reset the rotation amount to 0. Any added
rotation is removed.
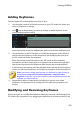
Applying Motion Blur
Select the Motion blur option to make PiP media movement appear smoother,
giving it a more natural and authentic look.
Once selected, use the available sliders as follows:
Blur length: drag this slider to set the duration (number of frames) you want
blended into a single frame (the blur). Dragging the slider right will apply
more of a blur to the moving PiP media.
Blur density: drag this slider to set the number of samples (of PiP media) used
per frame. Dragging the slider right will make the PiP media less blurry as it
adds samples to fill the missing content caused by the movement.
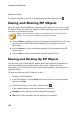
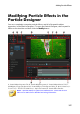
Adding PiP Masks
Masks are useful if you want to show/hide portions of your media on the timeline
in the final production. Click on the Mask tab and then select a mask from the list
to overlay portions of the PiP media. Click the Create Mask button to import and
create your own custom mask by importing any image in the .PNG format.
Click and drag the edges of the mask to move and resize it, or select Invert mask to
invert the portion of the media that is being masked. Use the Feather radius slider if
you want to adjust the softness on the mask's edges.
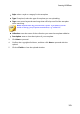
Object Settings
Use the Object Settings option to change some of the basic properties of the mask.
Use the Mask Opacity slider to set the desired transparency of the mask, or the
Mask Scale slider to change its size. You can use the X and Y Mask Position fields to
set the precise location of the top left corner of the mask on the video image.
Note: select the M aintain mask aspect ratio option if you want to ensure
the mask's aspect ratio does not change while you are moving or resizing it.
Deselect this option if you want to change the mask's shape or alter its
aspect ratio.