
Operation Manual


68
CyberLink PowerDirector
Creating Recorded Content
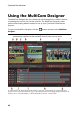
Once you have imported and then synchronized all the media clips in the MultiCam
Designer, you are ready to record your video. The recorded video is placed on the
recording track and then is imported into the Edit module's timeline once you click
OK.
To record your content, do this:
1. Select the camera (video source) you want to start off the recording with. You
can do this by simply clicking on the camera preview area.
2. If required, click on in the recording controls to set the preview window
resolution. Select the Create Shadow File for HD Video option to also create
a shadow file for the recorded file. This can help speed up editing when using
high definition files in your production.
3. When you are ready, click to begin recording. The MultiCam Designer will
start recording, adding the current selected camera footage as recorded
content on the recording track.
4. As required during the recording process, click another camera (video
source) or use keyboard hotkeys 1-4 to switch the recording to that
source's content.