
Operation Manual

58
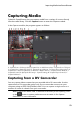
CyberLink PowerDirector
Note: when capturing from a DVD, this button reads Drive, allowing you to select
the specific disc drive you want to capture from.
Capture Preferences
Before capturing media, you can set the preferences for your captured content. The
capture preferences that are available, depend on the content you are capturing.
Set the capture preferences as follows:
to set a maximum capture length, select Time limit and then enter a time in
the timecode box.
to set a maximum captured file size, select Size limit and then enter a size
limit (in MB).
to add a text remark, date stamp, or time stamp to the video being captured,
click on the button. In the Add Text Overlay window, select which type
and display format of text overlay you want to include on your recorded
video on the Text tab. Select the Format tab to set the font and text position
for the text.
to take a still photo of a frame of video for use in your project, just click on
at the point where you want to take the snapshot. The image is saved to
the Captured content area. You can specify your preferred snapshot image file
format in preferences. See File Preferences for detailed information.
select Non real-time when capturing from a camcorder to continue
processing captured video after the original video stops playing in order to
ensure that no frames are dropped.
select Begin with fade-in to add fade-in to audio captured with a microphone.
select End with fade-out to add fade-out to audio captured with a
microphone.
select Record at maximum speed to record CD audio at a higher speed.
Capturing at a higher speed reduces processing time, but yields audio of a
lower quality.
Downloading Media
If you feel that you do not have enough media for your project, or you are looking
for specific media to make your creation just perfect, in the Edit module you can