
Operation Manual

228
CyberLink PowerDirector
Adding a Reflection
Select the Reflection option and then Apply reflection to add a reflection of the text
object onto the background media. Use the Distance slider to set space between
the reflection and the text object. Use the Transparency slider to set the opacity of
the reflection.
Setting Object Properties
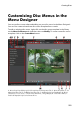
Click on the tab to set and customize all of your menu object
properties. The tab lists all of the current objects in your disc menu, including
menu buttons, images, and title text.
When you select an item in the objects list, the object is highlighted in the preview
window. Once highlighted, the objects are easily edited, resized, reshaped, or
moved around the disc menu to a desired location.
If you want any of the disc menu's objects to fade-in when the menu displays on
screen, select it and then the Fade-in object during menu opening option.
Select Display the selected object only to only display the selected object while
setting the properties. The properties that are available depend on the type of
object you select.
Modifying Menu Objects Position
You can change the position and orientation of the title text, images, buttons, etc.
in the disc menu.
Note: click on to use the TV safe zone and grid lines to help with the
precise placement of the precise placement of buttons, images, text, etc. on your
menu pages. Select Snap to Reference Lines to have the objects snap to the
grid lines, TV safe zone, and boundary of the menu area.
To modify menu object position or orientation:
click on a title text object, button, or an image, and then drag it to a new
position.
click on above the title text object, button, or image, and drag it right or
left to change its orientation.