
Operation Manual


52
CyberLink PowerDirector
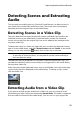
In the Captured Content area you can right click on media to perform a number of
options, including detecting scenes in video clips and deleting unwanted content
so that it won't import into the Edit window.
The content captured in CyberLink PowerDirector is stored in the folder noted
underneath the Captured Content area. If you want to store it in a different location,
click the Change Folder button and select a different folder.
Quality Profile Setup
To set the file format and quality of the media you capture, click the Profile button.
If this button is grayed out, that means that the original format and quality of the
media is maintained, as set on the original media device (camcorder, etc.).
The profile settings that are available depend on the capture device connected and
the capture mode you have selected.
Capture Settings
Use the Settings button to configure the set up of your selected capture device. The
capture settings that are available depend on the capture device connected and the
capture mode you have selected.
Note: when capturing from a DVD, this button reads Drive, allowing you to select
the specific disc drive you want to capture from.
Capture Preferences
Before capturing media, you can set the preferences for your captured content. The
capture preferences that are available, depend on the content you are capturing.
Set the capture preferences, as follows:
to set a maximum capture length, select Time limit and then enter a time in
the time code box.
to set a maximum captured file size, select Size limit and then enter a size
limit (in MB).
to add a text remark, date stamp, or time stamp to the video being captured,
click on the button. In the Add Text Overlay window, select which type
and display format of text overlay you want to include on your recorded
video on the Text tab. Select the Format tab to set the font and text position