
Operation Manual


16
CyberLink PowerDirector
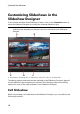
8. In the Preview window, the Slideshow Creator generates a version of your
slideshow. Use the available player controls to preview it.
Note: if you are not satisfied with the current slideshow, you can click the
Previous button to return to previous windows to select a different style, or import
more photos. You can also click the Customize button in the Preview window to
fully customize your slideshow in the Slideshow Designer. See Customizing
Slideshows in the Slideshow Designer for a detailed description of all the
available options for your selected slideshow style.
9. Click Next to continue.
10. You are done. Select from one of the following choices:
Produce Video: click to enter the Produce window where you can output
your slideshow to a video file, device, or upload it to a video sharing web
site. See Producing Your Project.
Create Disc: click to burn your slideshow to a disc, complete with a
professional looking disc menu, in the Create Disc window. See Creating
Disc.
Advanced Editing: click this option if you'd like to perform some more
advanced editing on your slideshow in the Edit window.
Note: if you select the Advanced Editing option, the Slideshow Creator adds
your created slideshow to the timeline in the Edit window as a combined video file.
If you would like to view each individual slide/photo in the slideshow for advanced
editing, just right click on the file in the timeline and then select Show Individual
Photos.
11. Click Finish.
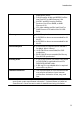
Setting Music Preferences
If you are using background music in your slideshow, click on the Music
Preferences button in the Style & Music window of the Slideshow Creator to
configure the preferences as follows:
1. In the Trim audio section you can trim the length of the music file you added
as background music as follows:
use the player controls to find the desired start point for the music, and
then click .
use the player controls to find the desired end point for the music, and