
Operation Manual


14
CyberLink PowerDirector
7. Click Next to continue.
8. In the Preview window, the Magic Movie Wizard generates a version of your
production. Enter a Starting title and Ending title for your production in the
fields provided, and then use the available player controls to preview it.
Note: if you are not satisfied with the current video production, you can click the
Previous button to return to previous windows to add/remove music, select a
different style, or import more media.
9. Click Next to continue.
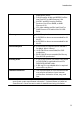
10. You are done. Select from one of the following choices:
Produce Video: click to enter the Produce window where you can
output your production to a video file, device, or upload it to a video
sharing web site. See Producing Your Project.
Create Disc: click to burn your production to a disc, complete with a
professional looking disc menu, in the Create Disc window. See Creating
Discs.
Advanced Editing: click this option if you'd like to perform some more
advanced editing on your production in the Edit window.
11. Click Finish.
Slideshow Creator
The Slideshow Creator is the easiest way to create a dynamic slideshow with your
photos.
To create a slideshow in the Slideshow Creator, do this:
1. Select Slideshow Creator when prompted which mode you prefer at startup.
The first Slideshow Creator window displays.
Note: if you are in the Full Feature Mode, you can launch the Slideshow Creator
by adding photos to the timeline, selecting them, and then clicking on the
Slideshow button above the timeline. See Using the Slideshow Creator for more
information.
2. In the Source window, click to import all of the photos you want to use
in your slideshow. Select Import Image Files to import a number of individual
photos, or select Import an Image Folder if all of your photos are in a specific
folder on your computer's hard drive. CyberLink PowerDirector will import all
of the supported image formats in the selected folder.