
Operation Manual


166
CyberLink PowerDirector
menu, the Background Media Adjustment Settings window displays. In the window
you can set the following:
Stretch Setting: on this tab, select what you want CyberLink PowerDirector to
do if the video clip or image you selected as the background has a different
aspect ratio than your disc menu template. Select Apply to all menu pages to
use this setting on all menu pages.
3D-BD Setting: if you are outputting a 3D video production as a 3D-BD* disc,
click on this tab to set the 3D source format of the background video you
imported. See Setting 3D Source Format for more detailed information.
Note: * optional feature in CyberLink PowerDirector. Check the version table for
detailed versioning information.
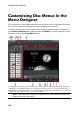
Selecting a Video Effect Background
To apply a video effect to your disc menu's background, click on the button
and then select the video effect from the list. Use any available settings to
customize the effect to your liking.
Adding Images to Menus
Click the button to import an image onto your disc menu. Once imported,
you can reposition and resize the image to fit your disc menu as required. If you
want to add an image as the menu's background, see Setting Menu Background.
Adding and Editing Disc Menu Text
You can add additional text to a disc menu, or completely customize the format
and alignment on the existing text in the Menu Designer.
Note: you cannot edit the text content in Menu Designer window. You must edit
this text in the disc menu preview window. See Editing Disc Menu Text for more
information.
Adding Text to Disc Menus
To add additional text to your disc menu, do this:
1. Click the button.