
Operation Manual


159
Creating Discs
if you have more than one title (video or project), your disc will have a Scenes
page in the Disc Preview Window. Note that when in the Menu Designer, it is
called the Titles page.
a Chapters page where you can navigate through your titles, if chapters were
added.
a Subtitles page that lets you enable/disable the subtitles on your disc.
Note: the Subtitles page in a disc menu is only available if you selected Create
subtitles for disc when creating subtitles in the Subtitle Room. See Adding
Subtitles for more information.
To set the disc menu template for your disc, do either of the following:
Note: you can set menu templates to all the pages in your disc menu, or either to
just the home/root page or to the sub pages (titles/chapters and subtitles pages).
If you don't want to set the menu template to all the pages, ensure the page that
you want to set it to is displayed in the disc menu preview window first before
selecting your template.
Right-click on the menu template's thumbnail in the menu library that you
want to use and then select:
Apply to set the menu page to the current menu page you are viewing in
the disc menu preview window.
Apply to All Pages to apply the menu template to all the pages in your
menu, i.e. home, titles, chapters.
Click on a menu template thumbnail in the menu library that you want to use
and then select:
Apply to set the menu page to the current menu page you are viewing in
the disc menu preview window.
Apply to All Pages to apply the menu template to all the pages in your
menu, i.e. home, titles, chapters.
Note: if required, you can download and import additional disc menu templates
from DirectorZone. See Downloading from DirectorZone for more information.
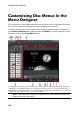
Editing Disc Menu Properties
CyberLink PowerDirector gives you full creative control over the look of your disc
menu. Use the menu navigation controls to preview the design and behavior of the
selected disc menu.