
Operation Manual


Chapter 2: Power2Go Program
15
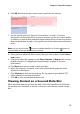
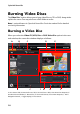
6. Click OK. Note that the disc content area is split into two sections.
7. Use the search pane (see "Using the Search Pane" on page 11 for more
information) to find to the files you want to include on your disc. Select the files
or folders you want to burn and then drag and drop them to either the secured
data area (indicated in pink) or the regular non-secured data area (indicated in
blue).
Note: you can also click the button to add the data files or click the button to
create a folder in the last disc area you selected.
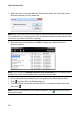
8. Once you have added all of the content that you want to burn, click the Burn
now button.
9. If required, adjust the settings on the Data, Common, or Burner tabs (see the
related sections in "Configuring Burning Settings" on page 39 for more
information.)
10. Click Burn when you are ready to burn your disc.
11. When the burning is complete, select one of the following options in the
window box that opens:
• Click View Log to view the burning log. The log opens in your default TXT
editor, where you can view and save it.
• Click OK to close the window and then exit.
Viewing Content on a Secured Data Disc
When you burn data to a secured disc with CyberLink Power2Go, the CyberLink
Secure Browser is included on the disc so that you can view the content on the
disc.