
Operation Manual

21
M ediaShow Workspace
Media Tray
When you start editing your media, creating new media, or you want to print and
share your, you must first add the media to the media tray.
To add media, media folder, or album to the tray, just select and drag it to the
media tray. You can also select the check box on individual media files to add them
to the tray.
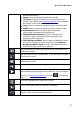
Once you have media in the tray, you can use the following buttons to:
- preview all of the media in the tray. Photos play in a slideshow, while any
videos in the tray play back normally.
- save and export the media tray contents to a folder on your computer.
Once selected, choose where to Save to Album in your library, or Save to
Local Drive, in a new folder, on your computer.
Note: you can also use the save button to download photos and videos from
Facebook, and photos from Flickr. The download of videos from YouTube is not
supported.
- select to remove the selected media file from the tray, or all of the media
if no media is selected. You can also drag and drop media onto the button to
remove it.
Preferences
Use the CyberLink MediaShow preferences to customize the behavior of the
program. To set the preferences, select the button.
General Preferences
In the Preferences window, select the General tab. The available options are as
follows:
Display tool tips: select this option to display hints when your mouse hovers
over certain features and buttons in the program.
Display all hidden files in the library folders: select this option to display the
media files you hid in a library folder. Once selected, hidden media is
displayed, but grayed out. You can then right click on grayed out media and