
Operation Manual

54
CyberLink M edia Suite
MPEG-2: standard definition format found on most DVD discs, and therefore
takes up less space.
Audio format: select the desired audio encoding used for your outputted
disc’s audio.
Aspect ratio: set the aspect ratio for the video. For DVDs you may select
between 4:3 or 16:9.
Quality: select the video quality of the disc’s video. The video quality settings
offer different bit rates, resulting in files of different sizes. The higher the
quality of the video, the larger the resulting file and the shorter the length of
video that can fit onto a disc.
Disc capacity: displays the available space on the disc currently inserted in the
selected optical drive (burning device).
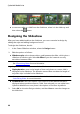
Preferences
Display TV safe zone in the Preview window: select to display a box that
indicates an area that will fit on most TVs, when previewing your completed
disc. Utilizing this feature ensures that menu items are within the display
range of most TVs.
Auto menu timeout: select this option for the video on your disc to play
automatically after displaying the menu for a short duration.
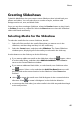
Burning Your Disc
The final step in creating your movie disc is to select the Burn button to begin
burning your media to disc. Before you proceed, use the Preview function to
ensure your disc is exactly the way you want it.
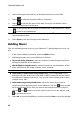
Upload to Social Network
You can share all of your photos with your friends and family by uploading them
directly from the CyberLink MediaShow library to Flickr and Facebook.
To upload photos to a social network, select the Upload to Social Networks
function within the Photo menu of CyberLink PowerStarter. The CyberLink
MediaShow main window displays.