
Operation Manual

49
Photo
to the slideshow.
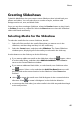
Create a Photo Gallery Disc
When you create a photo gallery disc, you are essentially creating a photo album
on a disc. You can create more than one album on a single photo gallery disc.
To create and burn a photo gallery disc, do this:
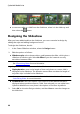
1. Select the Create a Photo Gallery Disc function within the Photo menu of
CyberLink PowerStarter, and then select the type of disc (CD, DVD, BD) you
want to create. The Photo Gallery Disc window opens.
2. In the Disc Compilation pane, if required, enter a custom name for the photo
album that will appear on the disc.
3. Use the search pane to find the photos you want to include on your disc.
Select the photos you want to burn and then drag and drop them in the disc
content area (Click the button to switch to the thumbnail view to make it
easier to find the exact photos you are looking for).
Note: you can also click the button to add the photos. Ensure that you have the
album you want to add the photos to selected in the Disc Compilation pane before
adding your photos.
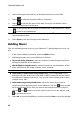
4. Repeat the last two steps to add more photos to an album as required. You
can also click the button to create a new album on the disc.
5. After you have added all of the photos you want on your disc, click the Burn
now button.
6. Click on the Gallery tab and then configure the photo gallery disc settings as
follows:
Gallery title: enter in a title for your photo gallery. The title displays on your
disc after it is burned.
Custom Logo: click on the Custom Logo button to customize the logo used in
your photo gallery, as follows:
Don't include logo in photo gallery: select this option if you don’t want to
include a logo in your created photo gallery.
Include logo in photo gallery: select this option if you want to include a
logo in your created photo gallery. Click the button to select an