
Operation Manual

33
Video
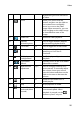
7. If your computer supports Intel CPU or ATI/NVIDIA GPGPU hardware
acceleration, in the Settings section click the button to Enable hardware
encoding and/or Enable hardware decoding to reduce the time it takes to
convert your media.
8. If the device you are converting the files for is connected, select the Transfer
to connected device after conversion option if you want CyberLink
MediaEspresso to transfer the files after conversion.
9. Click OK to start the conversion.
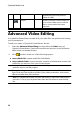
Create a Movie Disc
You can take the video files on your computer and produce a movie disc in the CD,
DVD or Blu-ray Disc* format, complete with stylish menus, in just a few simple
steps.
Note: * available in CyberLink Media Suite Ultra only.
To produce a movie disc in CyberLink PowerProducer, do this:
1. Select the Create a Movie Disc function and then the format of the disc you
want to create within the Video menu of CyberLink PowerStarter. The
CyberLink PowerProducer select media window displays.
Note: for a detailed description on how to customize your disc in CyberLink
PowerProducer, press the F1 key on your keyboard when within the program
window to open its help file.
2. Select your disc's video format. See the Selecting a Video Format section of
the CyberLink PowerProducer help file for more information.
3. Next, capture video or import existing video files into the program. See the
Acquiring Content section of the CyberLink PowerProducer help file for more
information.
4. Select and customize a disc menu for your movie disc. See the Creating Disc
Menus section of the CyberLink PowerProducer help file for more
information.
5. Finalize your disc by previewing your movie and then burning it to the disc.
See the Finalizing Content section of the CyberLink PowerProducer help file
for more information.