
Operation Manual

29
Video
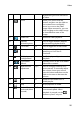
shot or the date the album was created.
Location taken: if required, enter the location where the media was shot.
Description: add a description for the album, if required.
3. Select OK. The custom album is saved to the media library.
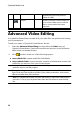
Easy Video Editing
CyberLink MediaShow offers several editing features, including trimming unwanted
portions from video clips, or performing various touch ups on videos in
preparation for editing, uploading, etc.
Note: the edits you make to a video file is not applied to the original source clip.
CyberLink MediaShow keeps a log of your desired changes and then asks you to
produce a new video file version when you are done editing.
To fix and enhance your videos, do this:
Note: you can easily undo any edits that you make to a video by right-clicking on it
in the media window and selecting Undo Changes. You can also click to
use the Edit Video - Log to roll back changes to a specific version.
1. Select the Easy Video Editing function within the Video menu of CyberLink
PowerStarter. The CyberLink MediaShow main window displays.
2. Select all of the videos in the media library that you want to edit, and then
drag and drop them in the media tray.
3. Select the Edit button, and then select Edit Media. The Edit window opens.
Note: you can also select a number of videos in the media library, right-click on
them, and then select Edit to access the Edit window.
Once you are done editing videos, select the Preview button to play them back, or
Save if save them as new video files. Select the Share button to send them to
friends and family, or post them on a social media website. See Upload to Social
Networks for more information.
Making Video Fixes
CyberLink MediaShow provides you with several common video fixes, including
auto lighting adjustments, fixing shaky video, and reducing unwanted video and
audio noise.