
Operation Manual


18
CyberLink M edia Suite
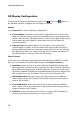
3D Display Configuration
To open the 3D Display Configuration window, click next to the button on
the playback controls. Configure the 3D settings as follows:
General
On the General tab, set the 3D display configuration.
3D scene depth: if required, use the slider to adjust the amount of 3D scene
depth on the video image, until the resulting 3D image is optimized for your
specific setup and your viewing experience. The 3D scene depth slider can be
used to adjust the scene depth on both native 3D and TrueTheater 3D
converted content.
Swap eye view: during the playback of 3D content, if you begin to feel
uncomfortable or uneasy, it may be because the layout of the 3D image is
displayed differently than most standard content. If this occurs, try selecting
the opposite eye view. This switches the way the 3D content is displayed on
your display device, and may reduce the discomfort.
Source Format
If 3D content is not displaying properly during the playback of 3D DVDs or video
files, you can manually set the 3D video format on the Source Format tab.
Auto detect: select this option to have CyberLink PowerDVD automatically
detect the video format of the 3D content for you. When selected, CyberLink
PowerDVD automatically plays 3D DVDs, video files, and photos in 3D when
3D mode is enabled. If CyberLink PowerDVD detects that you are playing a 2D
DVD or video file, it uses TrueTheater 3D to convert the 2D video to 3D.
Side by side format: select this option if the 3D content has two different
video images side by side. CyberLink PowerDVD merges the two images to
produce the 3D effect.
Over/Under format: select this option if the 3D content has two different
video images. one on top of the other. CyberLink PowerDVD merges the two
images to produce the 3D effect.
2D format: select this option if the content is in regular 2D mode and you
want to use CyberLink TrueTheater to convert it to 3D.