
Operation Manual


88
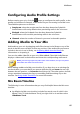
CyberLink AudioDirector
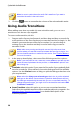
each track in your Mix room timeline has corresponding controls in the mixer
panel. If you cannot find an audio track, you can click and drag on the left
edge of the mixer panel to expand it, or use the scroll bar at the bottom to
find the track controls. The master track is always the last control (on the
right) in the mixer panel.
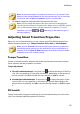
to mix your audio, ensure that audio track mode R is selected for all the tracks
that you want to alter the volume levels on. If R is not selected, you cannot
change the volume level in that track.
ensure that audio track mode I is selected to lock any audio tracks whose
volume levels you don't want changed.
click the play button and then use the master volume controls in each track
to mix your audio.
Note: you can continually alter the volume levels on each track throughout
the entire duration of the mix. When R is selected, CyberLink AudioDirector
records and remembers the changes you made to the volume at each
moment of your mix.
click the play button and then use the track balance controls in each track to
pan the audio left or right in the mix.
ensure that audio track mode P is selected and then preview your mix by
playing it back. This allows you to listen to and watch the recorded volume
levels (and track balance) change.
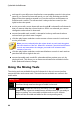
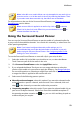
Using the Mixing Tools
The mixing tools are available for each of the tracks in the mix room timeline,
except the video and master track. The tools that are available are outline in the
below table.
Mixing Tools
If required, click this button and select a label for the track. Select an
icon that closely matches the type of audio in the track.
Click to enable this track for recording. Click the button at the
bottom of the CyberLink AudioDirector window when you are ready to
begin recording. You can enable multiple tracks at once. All their
inputs will be recorded and added to the corresponding track,