
Operation Manual


84
CyberLink AudioDirector
profile settings. See Configuring Audio Profile Settings for a description of
each of the available profile settings.
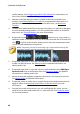
2. Add the audio files that you want to include in the mix to the Mix room
timeline. See Adding Media to Your Mix for more detailed information. For
detailed information about the timeline in the Mix room, see Mix Room
Timeline.
3. Position each added audio file to start precisely when you want it by dragging
it to the desired starting position. You can use timeline markers to make this
task easier. See Timeline Markers for more information.
4. If required, use the buttons to cut, copy, paste, or
delete the audio on the tracks. You can also select an audio file on a track and
click to split it at the timeline slider position into two separate parts that
can be moved separately among tracks.
Note: if required, you can click an audio clip on the timeline and drag the
beginning or end to quickly trim the audio file length.
5. If required, right click on an audio clip and then select Edit Clip in Edit Room
to edit it in the Edit room. See Editing Audio for detailed information on
editing audio clips.
6. If required, right click on an audio clip on a track and then select Edit Clip in
Restore Room to fix in the Restore room. See Restoring Audio for detailed
information on editing audio clips.
7. Mix all of the audio together using the mixing tools, mixer panel, and more.
See Mixing Audio for detailed information.
8. If required, select an audio clip on a track and go to the Adjustment panel to
apply an effect. See Applying Audio Effects in the Mix Room for more
information.
9. Preview your audio mix and once you are satisfied with the result, you are
ready to mix it down and produce it as a new audio file. See Producing Audio
for more information.