
Operation Manual


74
CyberLink AudioDirector
Using Noise Reduction
Use the Noise Reduction feature if your audio contains unwanted static, or other
background noise. There are two types of noise reduction available: Auto Denoise
and Noise Reduction.
To remove unwanted noise in your audio, do this:
1. Select the media file in the library that you want to remove audio from.
2. Decide whether you want to remove it from all the available channels, or just
one channel. See Selecting Channels for Editing for more information on
selecting channels.
3. Click Noise Reduction to open the Noise Reduction window.
4. Select one of the following options:
Auto Denoise: select this option to use audio denoise on audio that was
recorded outdoors, in a room with poor acoustics, in a car, or other noisy
locations. The audio denoise tool uses CLNR (CyberLink Noise Reduction)
technology to automatically improve your audio's quality and reduce
background noise. Also use it if you have trouble finding an audio sample in
the Noise Reduction feature. See Auto Denoise for more information.
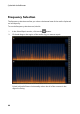
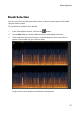
Noise Reduction: select this option to use CyberLink's Noise Reduction
technology to reduce broadband and tonal noise for more natural-sounding
results. CyberLink AudioDirector asks you to manually select an area that
contains the noise, then through analysis helps you remove it from your
audio. See Noise Reduction for more information.
5. Click Next to proceed.
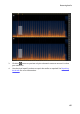
Auto Denoise
To use the Audio Denoise on audio, do this:
1. Use the Sensitivity slider to adjust the degree of denoise applied to the audio.
2. Use the Dry-Wet mix slider to set the ratio between the dry (original audio
that includes the unwanted noise) and wet (audio with denoise applied) audio.
Adjusting the mix can balance the original audio and the audio with the
denoise applied, reducing a loss of quality on the audio portion you want to