
Operation Manual


101
Creating CDs
Creating CDs
Chapter 10:
Once you are done editing, restoring, and mixing your media files, you can use
them to create CDs that are burned in the audio CD format.
Note: you can add both audio and video files to the CD, however just the
video file's audio is burned to the disc.
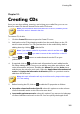
To create a CD, do this:
1. Click the Create CD button to open the Create CD room.
2. Add tracks to the CD by dragging media from the media library to the CD
track list view window. You can preview them in the media library before
adding them by clicking beside the file.
Note: if you added a media file by mistake, select it and then click to
remove it. Click if you want to remove all the media files on the CD.
3. Use the and buttons to order the tracks on the CD to your
preference.
4. If required, click on to edit the track information for each added media
file. When editing the CD-Text, you can add the song title, artist, album, and
writer information, and more. If adding the Album title and the Artist name,
and they are the same for each track, select the Apply album information to all
tracks and Apply artist information to all tracks options so you don't need to
add them for each track.
Note: this track information will only be visible on disc players that support
CD-Text reading.
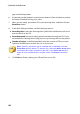
5. Before burning the CD, click on to edit the CD properties as follows:
Normalize volume in all tracks of the CD: select this option to set the volume
of all of the audio tracks on the CD to the same level.
Insert audio gap between tracks: select this option if you want to include gaps
of silence between each track on the CD. You can specify the length of the