
Operation Manual


97
Producing the Audio
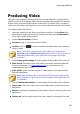
Producing Video
After you have edited the audio tracks of an imported video file, use the produce
video function to re-render the video with the updated audio applied. This produce
feature is also used when mixing down all the tracks in the Mix room, including a
video track, and then combining them into a single video file with the mixed audio.
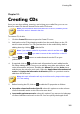
To produce a video file, do this:
1. Select the video file in the library you want to produce, click Produce in the
AudioDirector quick bar above the timeline, and then select Produce Video.
The Produce Video window opens.
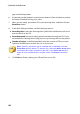
2. Set the File information as follows:
File name: enter in a new file name for the file.
Location: click on to set the location of the folder where the produced
video is saved.
Note: if you have a CyberLink Cloud subscription you can select the
Upload a copy to CyberLink Cloud option if you also want the program to
upload the produced file to your CyberLink Cloud storage space after
production.
3. Use the Video profile settings to set the quality of the produce file as follows:
Video format: select the format you want for the newly produced video file
from the drop-down. See Supported Formats for information on the
supported video file formats.
Video profile: select the video profile, or video quality, of the produced file
from the drop-down.
Note: when outputting video in the H.264 and H.265 formats, video profiles
with resolutions as high as 2K and 4K are available if the original video file
is compatible.
4. Use the Audio profile settings to set the quality of the produce file as follows:
Audio codec: select the audio used on the audio portion of the file from the
drop-down.
Bitrate: if required, set the bitrate for the video's audio by selecting it from the
drop-down.
Sample rate: set the sample rate of the video's audio by selecting it from the