
Operation Manual


87
M ix Room
Using the Surround Sound Panner
You can use the Surround Sound Panner to pan the audio of a selected audio clip
to any or all of the available channels. You can do this manually, or select from one
of the panning templates.
Note: if you haven't configured the audio profile settings yet, it is recommended
that you set the desired number of channels in your mix before using the Surround
Sound Panner. See Configuring Audio Profile Settings for more information.
To use the Surround Sound Panner on an audio clip in your mix, do this:
1. Select the audio clip in the Mix room timeline to use, or select the Master
Track if want to pan all of the audio in the mix.
2. Click Surround Sound Panner under the Apply Effect section.
3. If you selected the Master Track you can use range selection to select the
portion of the audio mix you want to apply the effect to. See Range Selection
for more information on selecting a range of an audio file. If you don't select
a range, the effect is applied to the entire audio mix.
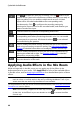
4. Select one of the following panner options:
Manually set channel output: select this option if you want the selected audio
to be panned to a specific channel, and not move. Once selected, click and
drag to the channel you want the audio to be panned to.
Use panning template: select this option if you want the selected audio clip to
pan across multiple channels. Select from one of the available templates. If
the panning template contains the icon, you can click and drag its path to
achieve the pan you require.
5. If required, click the Preview button to listen to how the applied effect
will sound.
6. Click Apply to apply the pan effect to the audio.