
Specifications


Configuring the Components
Server Procedure 930335A CyberData Corporation
18
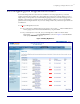
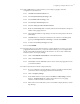
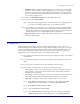
5.3.4.5 In the ‘Outbound Proxy Port’ field enter 5090.
5.3.4.6 In the ‘SIP User ID’ field enter the value from your RC account labeled ‘User
Name’.
5.3.4.7 In the ‘Authenticate ID’ field enter the value from your RC account labeled
‘Authorization ID’.
5.3.4.8 In the ‘Authenticate Password’ field enter the value from your RC account
labeled ‘Password’.
5.3.4.9 Be sure that the ‘Register with a SIP Server’ box is checked.
5.3.4.10 Leave all other settings at default values.
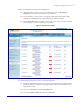
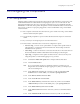
5.3.4.11 In the Dial-Out Settings section you can set what the Intercom should dial when
someone presses the Call button. Generally this would be another extension in
the system – for example the extension of your receptionist.
• Enter the extension or number the device should dial in the ‘Dial out
Extension’ field.
• Enter the extension number of the Intercom itself in the ‘Extension ID’
field.
5.3.4.12 Select Save.
5.3.4.13 Select Reboot.
5.3.4.14 After reboot your Intercom should be configured. You can now dial it using the
extension or direct-dial number. The Intercom should answer and you can
announce over the speaker. You can also press the Call button on the Intercom to
have it call the other extension you set in the dial-out section.
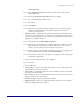
• Sensor Config – door and intrusion sensor detection – leave defaulted unless
performing advanced configuration.
• Audio Config – all options can be left at default. Allows you to customize audio tones
played by the device in various situations.
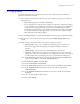
• Update firmware – allows you to update the firmware on the device. See CyberData
manual for updating firmware if necessary.