
Specifications


Configuring the Components
Server Procedure 930335A CyberData Corporation
17
• PGROUPS Setup – configures how the paging server will talk to the various paging
speakers. You can configure a number of paging groups – you just place a call to the
extension of the paging server, enter a paging group number on your keypad, and it
gets sent to that group. For the simple purpose of this document, we will assume you
are only using 1 paging group.
5.2.4.9 Click on the PGROUPS Setup button at the bottom of the screen.
5.2.4.10 Click to enable ‘Bypass DTMF’.
Note This will cause the paging server to automatically forward to paging group 0. If
you want to use multiple paging groups, do not enable this option.
5.2.4.11 You can enter a zone name next to zone 0. If necessary, change the multicast address
and port and take note of them, but you can generally leave them defaulted. Each
speaker that needs to be part of the paging group will need to have this information
entered (see the section on configuring the speakers and amplifiers).
• Upgrade Firmware – this is to upgrade the firmware of the device; see the instruction
manual for further details.
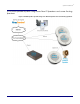
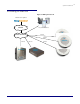
5.3 Intercom
Install the Intercom in the appropriate location following the instructions, and connect a PoE-
enabled Ethernet network cable to the device (plug is inside it) and plug it into your voice or main
network. Now briefly close the JP11 jumper on the back of the circuit board (inside the box). The
speaker will read aloud the IP address of the device. If it does not do so then it is not properly
plugged into a network with DHCP using a PoE-enabled switch and cable.
5.3.1 On a computer connected to the same network, open a web browser and go to the address
of the Intercom.
5.3.2 You should be prompted for a password. The default username and password are both
admin.
5.3.3 If you wish you can change the password immediately on the homepage.
5.3.4 There are tabs on the left for the various device configuration options:
• Device config – controls various optional behavior aspects of the speaker. Most are
self-explanatory or see the user manual for further info. These settings can be left
defaulted for basic operations.
• Networking – control how the device connects to the network. For most users this can
be left as defaulted for DHCP. If desired the network settings can be changed.
• Sip Config – configures how the speaker should connect to a SIP account.
5.3.4.1 In the ‘SIP Server’ field enter the value from your RC account labeled ‘SIP
Domain’ but leave off the ‘:5060’, so it should be ‘sip.ringcentral.com’.
5.3.4.2 In the ‘Remote SIP Port’ field enter 5060.
5.3.4.3 In the ‘Local SIP Port’ field enter 5060.
5.3.4.4 In the ‘Outbound Proxy’ field enter the value from your RC account labeled
‘Outbound Proxy’ but leave off the ‘:5090’ part, so just ‘sip.ringcentral.com’.