
Specifications
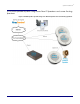


Configuring the Components
Server Procedure 930335A CyberData Corporation
16
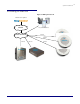
5.2 Paging Server
Connect the paging server to your network. It does not need to be physically connected to the
speakers so it can reside anywhere.
5.2.1 On a computer connected to the same network, open a web browser and go to the address of
the paging server.
• By default the paging server address is 192.168.3.10.
• If your computer is not on the 192.168.3.x subnet, you will need to change the ip address
on your computer to, for example 192.168.3.2, then go to the paging server configuration
on 192.168.3.10, and change it to match your network environment. When you have
changed it you can then change your computer back to the normal address. We suggest
you use static addresses for the paging server so you will know how to get to it in the
future and make a note of the IP address.
5.2.2 You should be prompted for a password. The default username and password are both admin.
5.2.3 If you wish you can change the password by pressing the ‘Admin Settings’ button at the
bottom.
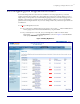
5.2.4 There are tabs on the bottom for the various device configuration options:
• Network setup – allows you to configure how the paging server connects to your
network. We suggest static IP addressing. Change these settings to match your
network.
• Admin Settings – sets the password for the administration of the device
• SIP Setup - configures how the paging server should connect to a SIP account. Your
paging server will connect as an extension on your RingCentral account. You will input
your RingCentral SIP account settings (see above for obtaining these settings) here.
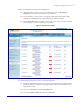
5.2.4.1 In the ‘SIP Server’ field enter the value from your RC account labeled ‘SIP Domain’
but leave off the ‘:5060’, so it should be ‘sip.ringcentral.com’.
5.2.4.2 In the ‘Remote SIP Port’ field enter 5060.
5.2.4.3 In the ‘Local SIP Port’ field enter 5060.
5.2.4.4 In the ‘SIP User ID’ field enter the value from your RC account labeled ‘User Name’.
5.2.4.5 In the ‘Authenticate ID’ field enter the value from your RC account labeled
‘Authorization ID’.
5.2.4.6 In the ‘Authenticate Password’ field enter the value from your RC account labeled
‘Password’.
5.2.4.7 Leave all other settings at default values.
5.2.4.8 Select Save Settings.