
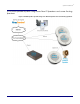
Specifications


Configuring your RingCentral Account
Server Procedure 930335A CyberData Corporation
13
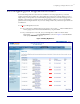
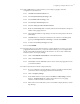
4.3.4 Click on Edit in the row of the extension you are using for paging to enter the
configuration for that extension.
4.3.4.1 Click Edit in the Business Hours row.
4.3.4.2 Switch ‘Play Introductory Greeting’ to No.
4.3.4.3 Switch ‘Enable Call Screening’ to No.
4.3.4.4 Switch ‘Play Connect Prompt’ to No.
4.3.4.5 Uncheck ‘Notify my Call Controller and wait’.
4.3.4.6 Make sure ‘Forward my calls’ is checked, and select from the list below the phone
number of the paging extension.
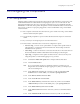
4.3.4.7 The maximum number of rings setting is not relevant as the speaker will answer
immediately.
4.3.4.8 Click Edit in the row of the phone number for the extension. In the dialog that
pops up set ‘Prompt me before connecting’ to off and click SUBMIT.
4.3.4.9 In section 3 for Take my messages select No.
4.3.4.10 Click SUBMIT.
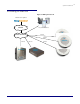
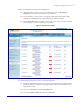
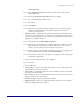
4.3.5 The paging device on your network will have a phone number. If you wish to only allow
paging from internal extensions, or only from certain numbers, you can configure this in
the Allowed and Blocked functionality for the extension. As above, click on Edit in the
Extensions section of Company Settings.
4.3.5.1 Click on ‘Blocked/Allowed Numbers’ on the left-hand menu.
4.3.5.2 Click on ‘Block All Calls’.
4.3.5.3 Add numbers into the ‘Allowed’ section to allow calls to the paging device from
your internal numbers.
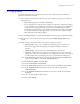
4.3.6 Remove the extension from the company directory.
4.3.6.1 If you’ve configured a company directory, which is accessible to external callers,
you’ll wish to remove the paging extension from the directory.
4.3.6.2 Click on Company Settings.
4.3.6.3 In the default extensions screen, between the Rules and My Settings columns,
there is a ‘Company Directory’ column. Click in the row for your paging
extension on the word ‘Yes’ to switch it to ‘No’.
4.3.6.4 If this column is not visible then you have not enabled company directory and can
skip this step.