Configuring CyberData Paging and Intercom Systems for Use with RingCentral Document Part #930335A CyberData Corporation 2555 Garden Road Monterey, CA 93940 (831) 373-2601 www.CyberData.
i Contents 1.0 Introduction ............................................................................................................................................1 2.0 What are the products? .........................................................................................................................2 2.1 V2 Ceiling Speaker .........................................................................................................................2 2.2 Outdoor Intercom ........................
1 1.0 Introduction RingCentral does not presently offer native support for Intercom and paging systems. There are, however, third-party VoIP/SIP based Intercom and paging systems that can work with the RingCentral service as a third-party device. RingCentral cannot provide full support for these devices, but we have documented the basic configuration of one such system sold by CyberData. You can get more information on the CyberData system, including where to buy, here: http://www.cyberdata.
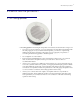
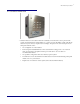
2 What are the products? 2.0 What are the products? 2.1 V2 Ceiling Speaker • V2 Ceiling Speaker– This ceiling-mount speaker can broadcast announcements in a large room. Server Procedure • It can serve as its own extension, or you can aggregate several together using multicast with the VoIP paging server. If you need more than 1 speaker, you will save on purchasing additional VoIP lines by using the VoIP paging server to aggregate your speakers or connecting standard analog speakers off of this speaker.
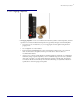
3 What are the products? 2.2 Outdoor Intercom • Outdoor Intercom – the outdoor Intercom essentially serves the same role as a phone in the system, except that it dials a fixed number. So a visitor can press the button, which will call the extension of your choice (a receptionist for example). The person who answers the phone can then speak with the visitor. Server Procedure • It is configured via a web interface. • Runs using PoE-enabled Ethernet.
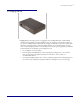
4 What are the products? 2.3 V2 Paging Amplifier • V2 Paging Amplifier– serves as an interface from the SIP system to external speakers; external speakers are connected with standard speaker wire, generally through a standard amplifier Server Procedure • It can serve as its own extension, or you can aggregate several together using the VoIP paging server. • It is configured via a web interface. • Runs using PoE-enabled Ethernet. PoE is a standard for routing power over a network cable.
5 What are the products? 2.4 Paging Server • Paging Server – the paging server can aggregate several independent sets of VoIP enabled speakers (ceiling speakers or paging amplifiers) into one extension on the system. In this way you can use one RingCentral extension/line for paging, and this device can control which other speakers are activated when you dial the paging extension.
6 System Architecture 3.0 System Architecture The system is extremely flexible and allows for a variety of configurations, using your existing speakers, new speakers, or a combination. The system can be segregated into various zones or treated as one zone. You can also use the Intercom devices for specialized needs such as entry doors. Most speakers are one-way announce-only but the Intercom devices as well as special talkback or two-way speakers allow a speakerphone type conversation.
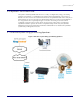
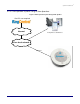
7 System Architecture 3.2 A One-speaker System Using a New Speaker Figure 2.
8 System Architecture 3.3 A Multi-speaker System Using New IP Speakers Figure 3.
9 System Architecture 3.4 A Multi-speaker System Using some New IP Speakers and some Analog Speakers Figure 4.
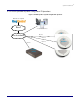
10 System Architecture 3.5 Adding an Intercom Figure 5.
11 Configuring your RingCentral Account 4.0 Configuring your RingCentral Account You’ll need a RingCentral account with one available line for each paging device you need to register. Generally this would be only 1 line needed. If you need only 1 paging speaker, you use a single ceiling or wall speaker. If you need multiple paging speakers you can use a Paging Server or amplifier, or the auxiliary connection from the ceiling speaker. In this way you can use multiple speakers with one RingCentral line.
12 Configuring your RingCentral Account 4.2 Record configuration information from RingCentral: 4.2.1 After purchasing your line(s), log in as an administrator and go to My Settings > DigitalLines. You will see a list of the lines you purchased. 4.2.2 Locate each line you wish to use for your paging system. Make sure the E911 column displays the word Edit. Otherwise, click Failed and provide the e911 data. 4.2.3 Click Setup Instructions for each line you wish to provision.
13 Configuring your RingCentral Account 4.3.4 Click on Edit in the row of the extension you are using for paging to enter the configuration for that extension. 4.3.4.1 Click Edit in the Business Hours row. 4.3.4.2 Switch ‘Play Introductory Greeting’ to No. 4.3.4.3 Switch ‘Enable Call Screening’ to No. 4.3.4.4 Switch ‘Play Connect Prompt’ to No. 4.3.4.5 Uncheck ‘Notify my Call Controller and wait’. 4.3.4.
14 Configuring the Components 5.0 Configuring the Components 5.1 V2 Ceiling Speaker Install the ceiling speaker in the appropriate location following the instructions, and connect a PoEenabled Ethernet network cable to the device and plug it into your voice or main network. The Status light should be green. Now use a paperclip or similar device to press and briefly hold the RTFM button on the front of the speaker. The speaker will read aloud the IP address of the device.
15 Configuring the Components ‘Authorization ID’. 5.1.4.10 In the ‘Authenticate Password’ field enter the value from your RC account labeled ‘Password’. 5.1.4.11 Be sure that the ‘Register with a SIP Server’ box is checked. 5.1.4.12 Leave all other settings at default values. 5.1.4.13 Select Save. 5.1.4.14 Select Reboot. 5.1.4.15 After reboot your speaker should be configured. You can now dial it using the extension or direct-dial number. The speaker should answer and you can announce over the speaker.
16 Configuring the Components 5.2 Paging Server Connect the paging server to your network. It does not need to be physically connected to the speakers so it can reside anywhere. 5.2.1 On a computer connected to the same network, open a web browser and go to the address of the paging server. • By default the paging server address is 192.168.3.10. • If your computer is not on the 192.168.3.x subnet, you will need to change the ip address on your computer to, for example 192.168.3.
17 Configuring the Components • PGROUPS Setup – configures how the paging server will talk to the various paging speakers. You can configure a number of paging groups – you just place a call to the extension of the paging server, enter a paging group number on your keypad, and it gets sent to that group. For the simple purpose of this document, we will assume you are only using 1 paging group. 5.2.4.9 Click on the PGROUPS Setup button at the bottom of the screen. 5.2.4.10 Click to enable ‘Bypass DTMF’.
18 Configuring the Components 5.3.4.5 In the ‘Outbound Proxy Port’ field enter 5090. 5.3.4.6 In the ‘SIP User ID’ field enter the value from your RC account labeled ‘User Name’. 5.3.4.7 In the ‘Authenticate ID’ field enter the value from your RC account labeled ‘Authorization ID’. 5.3.4.8 In the ‘Authenticate Password’ field enter the value from your RC account labeled ‘Password’. 5.3.4.9 Be sure that the ‘Register with a SIP Server’ box is checked. 5.3.4.
19 Configuring the Components 5.4 Paging Amplifier Connect the amplifier to your network using a PoE-enabled Ethernet network cable to the device and plug it into your voice or main network. You can connect a small number/size of speakers directly to the device via the ‘Spkr Out’ outputs or connect a larger number through an amplifier using the ‘Line-Out’ outputs. With at least one speaker connected, use a paperclip or similar device to press and briefly hold the RTFM button on the front of the amplifier.
20 Configuring the Components 5.4.4.11 In the ‘Authenticate Password’ field enter the value from your RC account labeled ‘Password’. 5.4.4.12 Be sure that the ‘Register with a SIP Server’ box is checked. 5.4.4.13 Leave all other settings at default values. 5.4.4.14 Select Save. 5.4.4.15 Select Reboot. 5.4.4.16 After reboot your amplifier should be configured. You can now dial it using the extension or direct-dial number. The amplifier should answer and you can announce over the speaker.