
Product specifications


Installing the VoIP Intercom
Configure the Intercom Parameters
Operations Guide 930242F CyberData Corporation
31
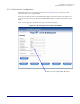
4. On the Sensor Setup page, enter values for the parameters indicated in Table 2-8.
5. After changing the parameters, click Save Settings.
Table 2-8. Sensor Setup Parameters
Web Page Item Description
Door Sensor
Flash Button LED* Select Yes to flash the LED until the sensor is deactivated
(roughly 10 times/second).
Activate Relay Select Yes to activate the relay until the sensor is
deactivated.
Play Audio Locally Select Yes to loop an audio file out of the Intercom speaker
until the sensor is deactivated.
Play Audio Remotely Select Yes to call a preset extension and play a pre-
recorded audio file (once).
Dial Out Extension Enter the button dial-out extension number.
Door Open Timeout (in seconds) Select the number of seconds that you want to pass before
the door sensor is activated.
Door Sensor Normally Closed Select the inactive state of the door sensors.
Intrusion Sensor
Flash Button LED* Select Yes to flash the LED until the sensor is deactivated
(roughly 10 times/second).
Activate Relay Select Yes to activate the relay until the sensor is
deactivated.
Play Audio Locally Select Yes to loop an audio file out of the Intercom speaker
until the sensor is deactivated.
Play Audio Remotely Select Yes to call a preset extension and play a pre-
recorded audio file (once).
Dial Out Extension Enter the button dial-out extension number.
Click this button to save your configuration settings.
Changing a parameter that has an asterisk next to it will
cause a system reboot when saved.
Link to the Intercom Setup page.
Link to the Network Setup page.
Link to the Upgrade Firmware page.
Link to the Home page.