VoIP Intercom Configuration Guide CyberData Corporation 2555 Garden Road Monterey, CA 93940 (831) 373-2601
COPYRIGHT NOTICE: © 2009, CyberData Corporation, ALL RIGHTS RESERVED. This manual and related materials are the copyrighted property of CyberData Corporation. No part of this manual or related materials may be reproduced or transmitted, in any form or by any means (except for internal use by licensed customers), without prior express written permission of CyberData Corporation.
Tech Note CyberData VoIP Intercom Configuration Guide TN103 August 08 1 Objectworld Communications Corp. • 308 Legget Drive • Ottawa, ON • Canada • K2K 1Y6 • T: 613‐599‐9698 • F: 613‐599‐7457 • www.objectworld.
© 2008 Objectworld Communications Corp. All rights reserved. Published August 25, 2008 Objectworld, Objectworld Unified Communications Server, Objectworld UC Server, Objectworld UC Client, Objectworld Connect, Objectworld Connect PLUS, IT Telephony, and The IT Telephony Company and UC Server are either trademarks or registered trademarks of Objectworld Communications Corp. in the United States and/or other countries. All other trademarks or registered trademarks are property of their respective owners.
Table of Contents 1 Introduction ..................................................................................................................................................... 4 1.1 Network Topology ..................................................................................................................................................... 4 2 Known Integration Issues ...........................................................................................................................
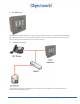
1 Introduction The CyberData SIP‐enabled VoIP Intercom is a door entry device that easily connects into existing local area networks (LANs) with a single cable connection. Its tamper‐proof design allows the unit to be mounted securely and safely. The intercom also has a dry contact relay switch which allows you to unlock doors remotely. 1.1 Network Topology This is the network topology for a single VoIP intercom configuration.
2 Known Integration Issues Known integration issues include: • Cannot perform supervised transfers – Transferring a caller to the paging device does not work and results in the phone infinitely indicating a transfer without completing. 5 Objectworld Communications Corp. • 308 Legget Drive • Ottawa, ON • Canada • K2K 1Y6 • T: 613‐599‐9698 • F: 613‐599‐7457 • www.objectworld.
3 Preparation This section provides instructions for how to apply firmware updates (if necessary) and how to set up the device for manual configuration. 3.1 PC Network Settings The factory default on CyberData products is a static IP address. To access the device, you must change your PC to the same subnet. NOTE: Make a note of your original network settings before making any changes because you must change these settings back after changing the network configuration on the paging device.
3. 4. 5. • Web Access Password: admin Click Network Setup. Under IP Addressing, select DHCP. Click Save Settings. 3.3 Determining the IP Address of the Intercom The paging device has an RTFM (Reset Test Function Management) switch that allows you to test or reset the device. This function also has the capability to announce the IP address. This is useful, for example, when you are using the paging device in a DHCP network configuration and need to know the IP address.
4 SIP Configuration 4.1 Gathering Information To configure the device, you need the following information. SIP User ID: This is equivalent to the identity address that you want to associate with the device. Authenticate ID: This is the SIP authentication identifier associated with the above identity. This is required by any SIP end‐point to register with the SIP PBX. Authenticate Password: This is the SIP authentication password associated with the above identity. 4.1.
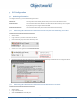
4. Go to View > Display Identities for all Profiles. 5. 6. Find the identity in the list that you want to use and double‐click the entry. Click SIP Authentication. 7. Record the User/login name and password from the following dialog because you will need it later to configure the device. 4.2 1. 2. Device Configuration Open your browser and type the IP Address of the paging device. When prompted, use the following default Web Access username and password: 9 Objectworld Communications Corp.
1. 2. 3. Web Access Username: admin Web Access Password: admin Click the SIP Setup button. Enter the following information: SIP Server: SIP User ID: SIP Authenticate ID: SIP Password: SIP Registration: Yes Primary number: Enter the extension of the person that is to be called. This is the extension that is dialed when a user presses the intercom button. Click Save Settings.
5 Auxiliary Relay Support The CyberData VoIP Intercom has a built‐in relay for devices such as a door lock mechanism to allow remote entry via the intercom. For information on the requirements and installation instructions for setting up the relay, see the CyberData Quick Reference guide. To configure the relay from the web interface 1. 2. 3. 4. 5. Open your browser and type the IP Address of the paging device.
6 Troubleshooting 1. You receive a voicemail prompt when dialing the identity of the device. Verify the following: • The identity was created in UC Server and the correct User ID and password are configured on the device o See section 4 • The SIP Server address on the device is set to the correct IP Address of UC Server o See section 4.2 • SIP Registration is enabled on the device o See section 4.2 2. You are unable to access the Web interface to configure the paging device.