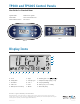
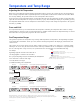
TP500 and TP500S Control Panels User Guide for Standard Menu System Model: All BP series systems Panel Model: TP500 and TP500S Series Panel Software Version: All versions TP500 TP500S Display Icons O N M L A B C D E F G H I J K A - Heat F - Light K - Auxiliary (Jets 3 or B - Ready Mode G - Cleanup Cycle L - Temperature Range (High / Low) C - Rest Mode H - Jets 1 M - Set (Programming) D - bba™2 On I - Jets 2 N - Filter Cycle (1 or 2 or Both) E - WiFi (Cloud Connection) J -
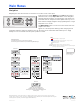
Main Menus Navigation Navigating the entire menu structure is done with 2 or 3 buttons on the control panel. Some panels have separate WARM (Up) and COOL (Down) buttons, while others have a single Temperature button. In the navigation diagrams Temperature buttons are indicated by a single button icon. Panels that have two Temperature buttons (Warm and Cool) can use both of them to simplify navigation and programming where a single Temperature icon is shown.
Fill it up! Preparation and Filling Fill the spa to its correct operating level. Be sure to open all valves and jets in the plumbing system before filling to allow as much air as possible to escape from the plumbing and the control system during the filling process. After turning the power on at the main power panel, the top-side panel display will go through specific sequences. These sequences are normal and display a variety of information regarding the configuration of the hot tub control.
Spa Behavior Pumps Press the “Jets” button once to turn pump 1 on or off, and to shift between low and high speeds if equipped. If left running, the pump will turn off after a time-out period. On non-circ systems, the low-speed of pump 1 runs when the blower or any other pump is on. If the spa is in Ready Mode (See page 6), Pump 1 low may also activate once in a while for at least 1 minute to detect the spa temperature (polling) and then to heat to the set temperature if needed.
Temperature and Temp Range Adjusting the Set Temperature When using a panel with Up and Down buttons (Temperature buttons), pressing Up or Down will cause the temperature to flash. Pressing a temperature button again will adjust the set temperature in the direction indicated on the button. When the LCD stops flashing, the spa will heat to the new set temperature when required. If the panel has a single temperature button, pressing the button will cause the temperature to flash.
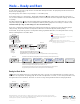
Mode – Ready and Rest In order for the spa to heat, a pump needs to circulate water through the heater. The pump that performs this function is known as the “primary pump.” The primary pump can be either a 2-Speed Pump 1 or a circulation pump. If the primary pump is a 2-Speed Pump 1, Ready Mode (indicated by ) will circulate water periodically, using Pump 1 Low, in order to maintain a constant water temperature, heat as needed, and refresh the temperature display. This is known as “polling.
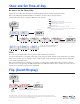
Show and Set Time-of-Day Be sure to set the Time-of-Day Setting the time-of-day can be important for determining filtration times and other background features. When in the TIME menu, SET TIME will flash on the display if no time-of-day is set in the memory. 24-hour time display can be set under the PREF menu.
Restricting Operation The control can be restricted to prevent unwanted use or temperature adjustments. Locking the panel prevents the controller from being used, but all automatic functions are still active. Locking the Temperature allows Jets and other features to be used, but the Set Temperature and other programmed settings cannot be adjusted. Temperature Lock allows access to a reduced of menu items.
Hold (Standby) Hold Mode –MO37* Hold Mode is used to disable the pumps during service functions like cleaning or replacing the filter. Hold Mode will last for 1 hour unless the mode is exited manually. Drain Mode Key Indicates Flashing or Changing Segment Some spas have a special feature that allows a pump to be employed when draining the water. When available, this feature is a component of Hold Mode. Sub-Menu Detail – STANDBY FOR 1 HR Drain Mode will time out with Hold Mode.
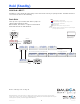
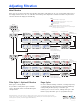
Adjusting Filtration Main Filtration Filter cycles are set using a start time and a duration. Start time is indicated by an “A” or “P” in the bottom right corner of the display. Duration has no “A” or “P” indication. Each setting can be adjusted in 15-minute increments. The panel calculates the end time and displays it automatically.
Light Timer Programming Light Timer Option Key Indicates Flashing or Changing Segment If LITE TIMR does not appear in the Main Menu, the Light Timer feature is not enabled by the manufacturer. Indicates Alternating or Progressive Message - every 1/2 second A temperature button, used for “Action” Menu/Select button When available, the Light Timer is OFF by default. Sub-Menu Detail – Set Light Timer Waiting time that keeps the last change to a menu item.
Preferences F / C (Temp Display) Change the temperature between Fahrenheit and Celsius. 12 / 24 (Time Display) Change the clock between 12 hr and 24 hr display. RE-MIN-DERS (Reminders) Turn the display of reminder messages (like “Clean Filter”) On or Off. Note: Reminders continue to run in the background even when not displayed. So turning the display of Reminders On or Off does not reset any Reminder counts. CLN-UP (Cleanup) Cleanup Cycle Duration is not always enabled, so it may not appear.
Preferences Sub-Menu Detail – User Preferences Key Indicates Flashing or Changing Segment Main Screen Indicates Alternating or Progressive Message - every 1/2 second A temperature button, used for “Action” Menu/Select button Waiting time that keeps the last change to a menu item. time (depends on menu item) that reverts to original setting and ***** Waiting ignores any change to that menu item. Press Menu/Select repeatedly until PREF appears in the LCD.
Utilities and Information INFO (System Information sub-menu) The System Information Menu displays various settings and identification of the particular system. SSID (Software ID) Displays the software ID number for the System. MODL (System Model) Displays the Model Number of the System. SETP (Current Setup) Displays the currently selected Configuration Setup Number. Heater Voltage (Feature not used on CE rated systems.) Displays the operating voltage configured for the heater.
Additional Utilities Utilities In addition to INFO, The Utilities Menu contains the following: GFCI (GFCI Test) (Feature not available on CE rated systems.) GFCI Test is not always enabled, so it may not appear. This screen allows the GFCI to be tested manually from the panel and can be used to reset the automatic test feature. If the GFCI Test Feature is reset, the device will trip within 7 days.
Utilities Sub-Menu Detail – Utilities Continued Key Indicates Flashing or Changing Segment Indicates Alternating or Progressive Message - every 1/2 second A temperature button, used for “Action” Menu/Select button Waiting time that keeps the last change to a menu item. time (depends on menu item) that reverts to original setting and ***** Waiting ignores any change to that menu item. Press Menu/Select repeatedly until UTIL (Utilities) appears in the LCD. Start display of string.
Utilities – GFCI Test Feature Not Available on CE Rated Systems. A GFCI is an important safety device and is required equipment on a hot tub installation. Your spa may be equipped with a GFCI Protection feature. (UL rated systems only.) If your spa has this feature enabled by the manufacturer, the GFCI Trip Test must occur to allow proper spa function. Within 1 to 7 days after startup, the spa will trip the GFCI to test it. (The number of days is factory programmed.
Utilities – Fault Log A Little History can tell a lot The Fault Log stores up to 24 events in memory and they can be reviewed under the Fault Log Menu. Each event captures a Fault Message Code, how many days have passed since the fault, Time of the fault, Set Temperature during the fault, and Sensor A and B temperatures during the fault.
General Messages RUN PMP5 PURG AIR ---- Priming Mode – MO19 Each time the spa is powered up, it will enter Priming Mode. The purpose of Priming Mode is to allow the user to run each pump and manually verify that the pumps are primed (air is purged) and water is flowing. This typically requires observing the output of each pump separately, and is generally not possible in normal operation. Priming Mode lasts 4 minutes, but you can exit it earlier by pressing any Temp button.
Heater-Related Messages HTR FLOW LOSS ---- Heater Flow is Reduced (HFL) – MO16 There may not be enough water flow through the heater to carry the heat away from the heating element. Heater start up will begin again after about 1 min. See “Flow Related Checks” below. HTR ---- Heater Flow is Reduced (LF)* – MO17 There is not enough water flow through the heater to carry the heat away from the heating element and the heater has been disabled. See “Flow Related Checks” below.
Sensor-Related Messages 5N5R BAL- ANCE Sensor Balance is Poor – MO15 The temperature sensors MAY be out of sync by or 3°F. Call for Service. 5N5R 5YNC ---- CALL FOR 5RVC ---- Sensor Balance is Poor* – MO26 The temperature sensors ARE out of sync. The Sensor Balance is Poor fault has been established for at least 1 hour. Call for Service. 5N5R A ---- CALL 5RVC ---- B Sensor Failure – Sensor A: MO31, Sensor B: MO32 A temperature sensor or sensor circuit has failed. Call for Service.
System-Related Messages MEM Memory Failure - Checksum Error* – MO22 At Power-Up, the system has failed the Program Checksum Test. This indicates a problem with the firmware (operation program) and requires a service call. 5TUK PUMP Memory Warning - Persistent Memory Reset* – MO21 Appears after any system setup change. Contact your dealer or service organization if this message appears on more than one power-up, or if it appears after the system has been running normally for a period of time.
System-Related Messages 5TUK PUMP A Pump Appears to be Stuck ON – MO34 Water may be overheated. POWER DOWN THE SPA. DO NOT ENTER THE WATER. Contact your dealer or service organization. HOT CALL 5RVC A Pump Appears to have been Stuck ON when spa was last powered - MO35 POWER DOWN THE SPA. DO NOT ENTER THE WATER. Contact your dealer or service organization.
Reminder Messages General maintenance helps. The display of Reminder Messages can be suppressed by using the PREF Menu. See Page 12. Reminder Messages can be chosen individually by the Manufacturer. They may be disabled entirely, or there may be a limited number of reminders on a specific model. The frequency of each reminder (e.g. 7 days) can be specified by the Manufacturer. Press a Temperature button to reset a displayed reminder message. CHEK PH Alternates with temperature or normal display.
Reminder Messages Continued CHNG WATR Alternates with temperature or normal display. Appears on a regular schedule, e.g. every 90 days. Change the water in the spa on regular basis to maintain proper chemical balance and sanitary conditions. CLN COVR Alternates with temperature or normal display. Appears on a regular schedule, e.g. every 180 days. Vinyl covers should be cleaned and conditioned for maximum life. TRT WOOD Alternates with temperature or normal display.
Warning! Qualified Technician Required for Service and Installation Basic Installation and Configuration Guidelines CSA Compliance/Conformité Use minimum 6AWG copper conductors only. • Test the ground fault circuit interrupter or residual current device before each use of the spa. Caution: Torque field connections between 21 and 23 in lbs. • Read the instruction manual. Readily accessible disconnecting means to be provided at time of installation.