
Installation Instructions


Contractors Wardrobe
®
, 26121 Avenue Hall, Valencia, CA 91355 | Phone: 661.257.1177 Fax: 661.257.4907 | CwDoors.com
Coast
™
-PRIN-2800-0220
9
Figure 9c
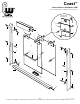
E. Slide the Center Guide under the two Door
Panels. Center the Center Guide on the pencil mark
you made (See Figure 9b). Press the Center Guide
onto the Curb and lock it into position by pressing
firmly on the back edge of the Center Guide as
shown in Figure 9c. You should feel it lock into place.
If the Center Guide doesn’t lock into position easily,
it may be necessary to press firmly on one end to
start the process and work along the back of the
Center Guide in order to lock it into place.
Center
Guide (#12)
Curb
(#3)
Figure 9b
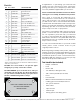
Step 10 Installing the Towel Bar and
Knob with Recessed Finger Pulls
Before you begin, refer to Figure 10 to determine the
correct orientation of hardware for your installation.
The Inside Door Panel with Knob will slide to the wall
nearest the shower head. The Outside Door Panel
with Towel Bar will slide to the opposite wall.
Figure 10
Shower head
on the left
Shower head
on the right
A. Installing the Towel Bar to the Outside Panel
1. Locate the Towel Bar Kit parts for the
Outside Door including Towel Bar, two Towel
Bar Adapters, two Recessed Finger Pulls, four
Washers and two Bushings. Refer to Figure 11 to
help identify these parts for your hardware style.
2. Slide both Door Panels to the wall opposite the
shower head. Now slide the Outside Door Panel
5-6” toward the shower head. This will give you
clearance to perform the next step.
3. Keeping the Towel Bar Adapters attached to
the ends of the Towel Bar on both sides, detach
both Recessed Finger Pulls, keeping one Washer
and the Bushing on the Recessed Finger Pulls.
4. From inside the shower, insert the Recessed
Finger Pull with one Washer and Bushing
through the hole on the Outside Door Panel, so
that the end sticks out from the front side of the
glass Panel.
5. Place the other Washer over the exposed end
of the Recessed Finger Pull, and screw it into one
end of the Towel Bar “finger tight.”
Note: The Solana Towel Bar comes with screws
which go through the Recessed Finger Pulls to attach
them to the Towel Bar. Slightly tighten screws with a
phillips screwdriver.
6. Repeat Step B, 2-4 through the other hole of
the Outside Door Panel to complete installation
of the Towel Bar (See Towel Bar Assembly,
Figure 11).
7. Tighten both sides of the Towel Bar/Recessed
Finger Pull.
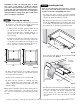
Center
Curb
(#3)
Center Guide
(#12)
Inside
Door Panel
Inside
enclosure
Outside
enclosure
Outside
Door Panel
Press here