
Installation Instructions


Contractors Wardrobe
®
, 26121 Avenue Hall, Valencia, CA 91355 | Phone: 661.257.1177 Fax: 661.257.4907 | CwDoors.com
Coast
™
-PRIN-2800-0220
8
A. Slide the Inside Door Panel toward the wall with
the shower head. Slide the Outside Door Panel to
the opposite wall. With the Panels in this position,
if the edges of the Door Panels do not touch the top
and bottom Panel Locator/Bumpers at the same
time, or the Door Panels are too high off the curb,
the Door Panels need to be adjusted to prevent
leakage.
B. One or more of the Wheels may need to be
adjusted to properly align the Door Panels. With the
Door Panels in the correct position, remove pressure
by slightly lifting the Door Panel. Using a 1/4” open
end wrench, loosen the #8-32 x 3/8” PHWH Screw
securing the Wheel and slide the Wheel in either
direction (See Figure 8 ) until the Door Panel touches
the top and bottom Panel Locator/Bumpers at the
same time. Tighten the screw. Repeat until both
Panels are properlly adjusted.
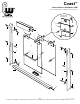
Step 8 Adjusting and aligning
the Door Panels
Figure 8
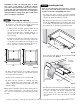
Figure 9a
Rotate Center
Guide (#12)
under
lip
Curb
(#3)
Step 9 Installing the Center Guide
WARNING! DO NOT ATTEMPT TO LOCK THE CENTER
GUIDE IN PLACE UNTIL YOU ARE READY TO INSTALL
IT! Once the Center Guide is in place the shower Door
Panels will be extremely difficult to remove, and
adjusting or removing the Center Guide will be nearly
impossible.
Note: There are two Glass thicknesses available, 1/4”
(6mm) or 5/16” (8mm).
A. Locate your Center Guide(s). If you received two
Center Guides, select the color that best matches
your finish.
B. Make sure that the surface of the Curb is
completely clean of oil, dust, debris or other
contaminants. With a tape measure, measure from
Wall Jamb to Wall Jamb and, with a pencil, mark
the center point of the Curb on the inside edge of
the Curb or lightly on the tub sill or tile where it will
be visible and easy to remove. Remember, you will
want to be able to see the pencil mark after you
insert the Center Guide into the groove in the Curb
so that you can center the Center Guide.
C. Remove the corner protectors from glass.
D. Slide both Door Panels to one side. Peel the
paper backing off the two-way tape on the bottom
of the Center Guide. Without letting the adhesive
tape touch the Curb, carefully insert the front edge
of the Center Guide into the groove on the Curb (See
Figure 9a).
Glass Thickness Center Guide
1/4” (6mm) HARD-2000
5/16” (8mm) HARD-2005
Header (#1)
Top Rail Wheel
Assembly (#9)
Hex Screw (#9c)