
Installation Instructions


Contractors Wardrobe
®
, 26121 Avenue Hall, Valencia, CA 91355 | Phone: 661.257.1177 Fax: 661.257.4907 | CwDoors.com
Coast
™
-PRIN-2800-0220
7
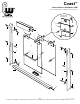
Outside
Panel
Wheel
Figure 6b
Inside
Panel
Wheel
Step 7 Installing the Door Panels
Installing the Door Panels may be easier if you have
someone assisting you. Always wear gloves and
safety glasses whenever handling glass.
Note: Take extra care in handling the glass Panels.
DO NOT allow the corners of the Panels to strike
the tub/tile, each other, any hard surface, wall or
floor, as these actions may cause damage and
the tempered glass will shatter. Keep the corner
protectors on the glass during installation.
A. Hold the Inside Door Panel so that the Wheels
are facing away from you. Standing outside and
facing the shower enclosure, lift the Inside Door
Panel up and over the Curb and then insert the
Top Rail Wheel Assemblies up into the Header
and gently set the Wheels into the rear track of the
Header. Make sure that the Panel rolls freely.
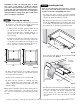
Push with
index finger
Tub Sill/
Shower Dam
Figure 7
Inside
Tub
Outside
enclosure
Header
(#1)
Curb (#3)
Outside Door Panel
(#10)
Inside Door
Panel (#11)
B. If someone is assisting you, have them hold
the Inside Door Panel back, out of your way for
this step. Hold the Outside Door Panel so that the
Wheels are facing towards you. Standing outside
and facing the shower enclosure, use the index
fingers of both hands to carefully push the Inside
Door Panel back and out of the way as you lift the
Outside Door Panel up and over the Curb and then
insert the Top Rail Wheel Assemblies up and into
the Header (See Figure 7). DO NOT let the two Panels
strike one another. Gently set the Wheels into the
front track of the Header.
C. Carefully let the Inside Door Panel ease back
into position. Make sure both of the Panels roll
freely.
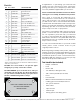
Top Rail, Gasket and Bushing (See Figure 6a).
H. Repeat on the other hole of the Inside Door Panel,
ensuring both Wheels face the same direction.
I. Attach the remaining two Top Rail Wheel
Assemblies on the Outside Door Panel.
Note: If your glass has a textured side, both Wheels
should face the TEXTURED side of the Outside Door
Panel (See Figure 6b). The textured side of both Panels
should face outside the enclosure.
Textured
side of
glass
Textured
side of
glass