
Installation Instructions


Contractors Wardrobe
®
, 26121 Avenue Hall, Valencia, CA 91355 | Phone: 661.257.1177 Fax: 661.257.4907 | CwDoors.com
Coast
™
-PRIN-2800-0220
6
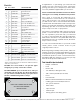
Step 5 Installing the Header
A. Using the tape measure, measure the width
just above the top of the left and right Wall
Jambs. (Remember, the width at the bottom of the
enclosure may NOT be the same as the width of
the top of the enclosure because walls may not be
plumb and square).
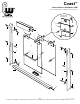
B. Locate the Header. Using the miter box and
hacksaw, cut the Header to the length you just
measured.
C. The Coast
™
comes with
a positive snap-lock feature
which eliminates the need
for screws to hold the
Header in place. Choose
which of the two styles on
the reversible Header you
would like to face out, and
position it over the top of
the Wall Jambs. Spread
the Header sides slightly as
you pull it down onto the
Wall Jambs. You should be
able to hear and feel when
it solidly locks in place (See
Figure 5).
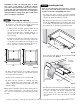
Step 6 Attaching Top Rail and Wheels to
the Door Panels
A. Locate the four Ball Bearing Wheels, and the four
#8-32 x 3/8” PHWH Screws.
B. Using a philips
screwdriver, attach
a Wheel to each Top
Rail Wheel Assembly
in the center, position
“3” (See Figure 6).
Figure 5
Header (#1)
shown with
Modern side
facing out
Wall Jamb
Right (#2R)
Glass Thickness Gasket
1/4” (6mm) Thick
5/16” (8mm) Thin
Note: The Wheel may need to be loosened and
moved in the opening later to adjust the position of
the Panel.
C. Locate the Inside Door Panel. Locate two of
the Top Rail Wheel Assemblies, two Gaskets, two
Connector Bolts and two Bushings.
Note: There are two Glass thicknesses available 1/4”
(6mm) or 5/16” (8mm). If you purchased 5/16” (8mm)
Glass locate the 5/16” (8mm) package that includes
the thinner Gaskets to be used with your unit.
D. Insert a Bushing into each of the two holes at
the top of the Inside Door Panel.
E. Place a Gasket over the top edge of the Inside
Door Panel. The hole on the Gasket should align
with the hole on the Bushing.
F. Place a Top Rail over the Gasket on the Inside
Door Panel.
Note: If your glass has a textured side, both Wheels
should face the NON-textured side of the Inside
Door Panel.
G. Attach the Top Rail to the Inside Door Panel by
inserting the Connector Bolt through the hole in the
Figure 6
Top Rail Wheel
Assembly (#9)
Top Rail (#9a)
Gasket (#9d)
Bushing (#9e)
Connector
Bolt (#9f)
Figure 6a
Inside Door
Panel (#11)