
Installation Instructions


Contractors Wardrobe
®
, 26121 Avenue Hall, Valencia, CA 91355 | Phone: 661.257.1177 Fax: 661.257.4907 | CwDoors.com
Coast
™
-PRIN-2800-0220
5
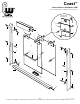
Step 4 Installing the
Panel Locator/Bumpers
See Figure 4 to position the Panel Locator/Bumpers.
Secure with #8 x 1-1/2” PH SMS Screws.
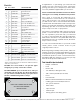
Step 3 Installing the Wall Jambs
Note: The Coast
™
comes with two Wall Jambs. One is
notched for the left wall, the other is notched for the
right wall. Each Wall Jamb is marked clearly on the
bottom back side: “L” for left, “R” for right.
A. Locate the left Wall Jamb.
B. Place the left Wall Jamb against the left wall
and slip the bottom of the Wall Jamb over the Curb.
Use a Level, held against the side of the Wall Jamb
to align it vertically straight up and down as shown
in Figure 3.
Panel Locator/
Bumper (#5)
Left
Wall Jamb
(#2L)
Panel Locator/
Bumper (#5)
Panel Locator/
Bumper (#5)
Panel Locator/
Bumper (#5)
Right
Wall Jamb
(#2R)
Figure 4
Figure 3
Top of Wall Jamb (#2L)
Level
Outside
enclosure
Curb
(#3)
#8 x 1-1/2” FH
SMS Screw
(#6)
Inside
enclosure
C. Use a pencil to mark the position of each of the
three pre-drilled holes in the left Wall Jamb. Set the
Wall Jamb aside for the moment.
D. Using either a 1/8” drill bit (for a fiberglass
enclosure) or a 3/16” masonry drill bit (for tile) drill
three holes where you made the marks. If installing
in a tiled enclosure, gently tap a Screw Anchor into
each hole. DO NOT use the Screw Anchors for a
fiberglass enclosure.
E. Place the Wall Jamb back over the Curb and
against the wall and secure with a single #8 x 1 1/2”
FH SMS Screw in the MIDDLE hole only.
F. Repeat Steps 3A-D for the right Wall Jamb,
marked on the bottom with an “R.”
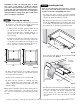
E. Locate the Panel Glide Strip. (See Figure 2).
Using the wire cutters, cut it 3/4” shorter than the
Curb. Re-install the Panel Glide Strip into the Curb
so that the ends of Panel Glide Strip are evenly
spaced at each end of the Curb.
F. Cut two pieces of painters tape 12” long. Next,
use the caulking gun and apply a thick bead of
silicone sealant (approximately 3/8” in diameter)
to the bottom surface of the Curb as indicated in
Figure 2. Position the Curb on the tub/shower sill.
Use the two strips of painters tape to temporarily
secure the Curb in place. DO NOT place the tape
within 2” of the wall.
Note: The tape will help provide a positive seal to the
tub/shower sill while also holding the Curb in place
for the following steps, ensuring the silicone adheres
and seals the unit.