
Installation Instructions


Contractors Wardrobe
®
, 26121 Avenue Hall, Valencia, CA 91355 | Phone: 661.257.1177 Fax: 661.257.4907 | CwDoors.com
Coast
™
-PRIN-2800-0220
4
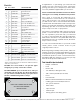
Step 2 Installing the Curb
Step 1 Preparing your opening
Note: If your tub/shower enclosure has a curve in
the corners at the side walls, be sure to measure the
distance from wall to wall ABOVE the curves.
A. Using the tape measure, measure between
right and left walls along the flattest part of the tub/
shower sill. Write this dimension down.
B. Using the tape measure, find the center of the
tub sill (See Figure 2). Make a mark where the center
is, and add 1” to this mark. Place a new mark on the
front of tub sill on both the right and left sides.
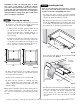
C. Locate the Curb. Remove the Panel Glide Strip
from the Curb (See Figure 3).
D. Using the measurement from Step 2A, cut the
Curb to this length. Use the miter box and hacksaw
to make a straight cut. If your tub/shower has
curved corners, use a fine metal file to round off
and shape the ends of the Curb to fit the rounded
corners.
CAUTION: Do NOT cut tempered glass or allow
the corners of the panels to strike the tub/tile,
each other, any hard surface, wall or floor, as these
actions may cause damage and the tempered glass
will shatter. Keep the corner protectors on the glass
during installation. Using safety glasses and safety
gloves is highly recommended.
Figure 2
Tub sill
center
Alignment
marks
Figure 3
Outside
enclosure
Curb
(#3)
Painters tape
Inside
enclosure
Panel Glide
Strip (#4)
Silicone
Alignment
mark
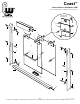
A. Before you remove the existing enclosure and
all its parts, check that your newly purchased
enclosure is the correct size (See Figure 1).
1. Measure the finished opening width at top
(a) and bottom (b). Your new tub or shower
enclosure should have a width equal to or
greater than the largest measured width of
your opening.
2. Measure the finished opening height from
the tub or shower sill (c) to the top of your tub
or shower surround/tile (d). The height of your
tub or shower enclosure should not exceed the
top of your tub or shower surround/tile.
B. After determining that your newly purchased
enclosure is the correct size, remove the existing
enclosure and all its parts.
C. Remove all screw anchors from the wall.
D. Clean silicone sealant or caulking and any
other contaminants from tub/shower and wall
surfaces. Fill any remaining holes with silicone for
waterproofing.
Note: Unless otherwise stated, views and directions
given in these instructions – left, right, front, back,
etc. – are from outside the enclosure, facing the tub/
shower.
KNOW YOUR WIDTH
KNOW YOUR HEIGHT
•
Measure the finished opening width at top A.
and bottom B.
•
Use the measured width to select the appropriate
tub/shower enclosure width.
•
Select the tub/shower that has a width that is equal or
greater than the largest measured width of your opening.
•
Measure the finished opening height from the tub or shower curb
C. to the top of your tub or shower enclosure or tile D.
• The tub or shower height should not exceed our noted
model’s height.
SHOWER
Height
A.
B.
C.
TUB
A.
B.
D.
Height
C.
D.
Tub
Shower
a
b
c
d
Figure 1
a
b
d
c
Height
Height